Appendix A: Mobile device setup
Mobile devices such as mobile phones and tablets have become valuable tools in data collection. Various applications have been and are being developed specifically to harness the utility of mobile devices for collecting data. An understanding of how mobile devices work specifically those powered by Android operating system is therefore a requisite knowledge for anyone involved in a data collection campaign that utilises these devices for data collection. This tutorial gives a brief overview on how to get started with an Android device. We chose to focus on the use of tablet devices because we think that the smaller sized tablets (up to 7-inch) are a good mix of the mobility and handiness of a mobile phone and the wider screen size of a tablet which is good for fitting relatively dense question sets adequately. We also chose to focus on Samsung-branded because they are probably the most common brand of mobile devices available and we think most users have most likely had an experience using devices from this brand beforehand. We use the Samsung SM-T230 as the model device for instructional purposes.
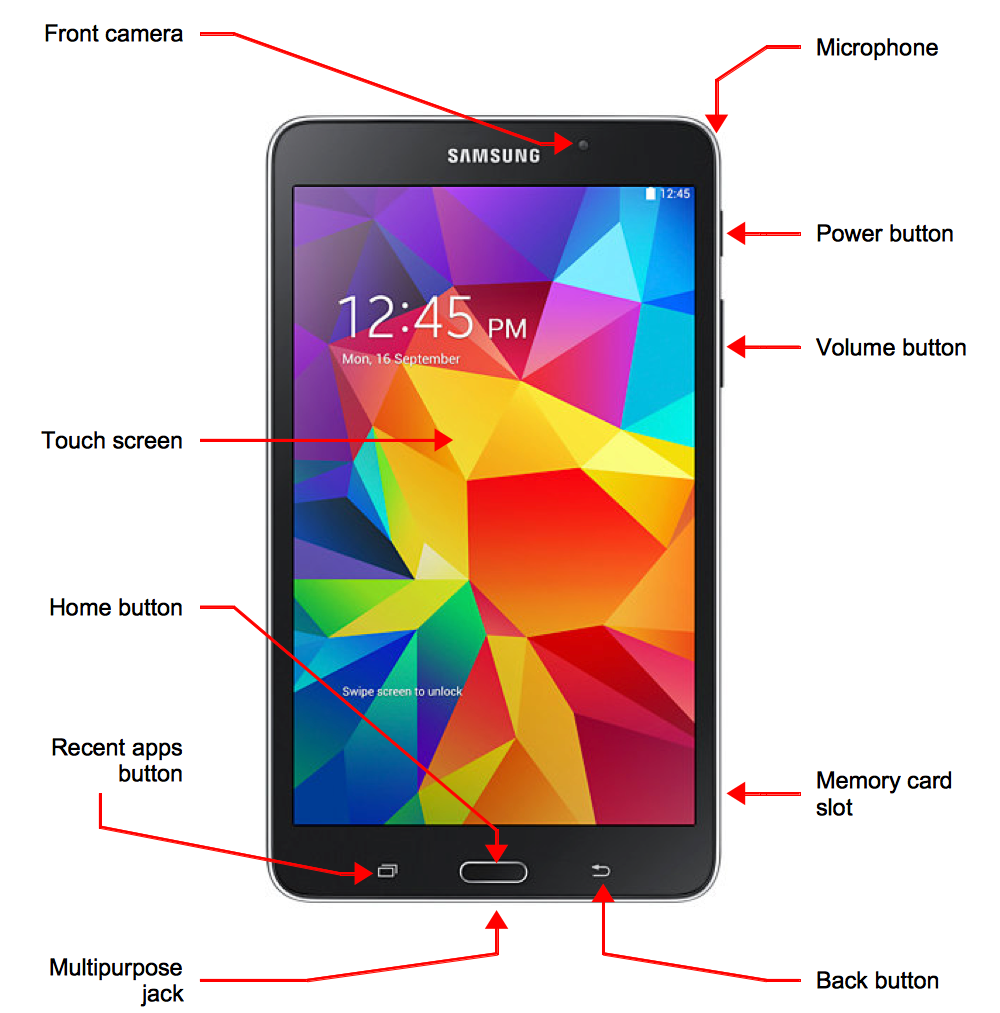
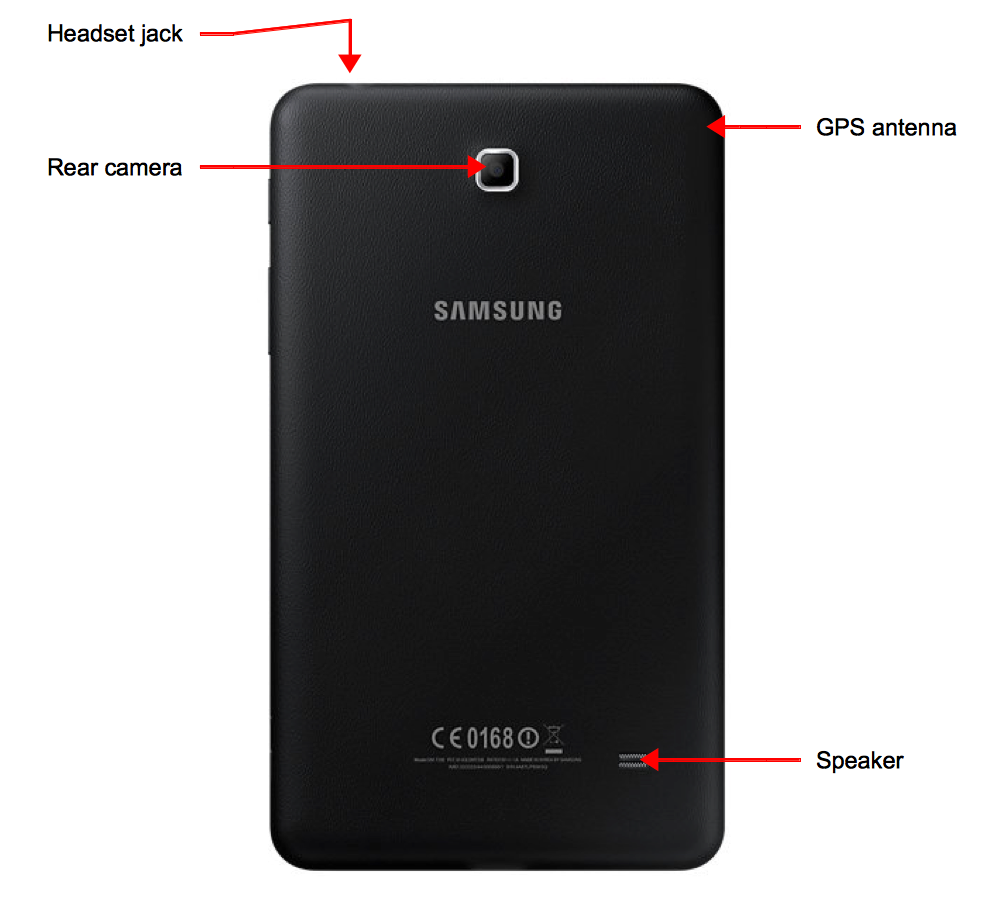
A.1 Device layout
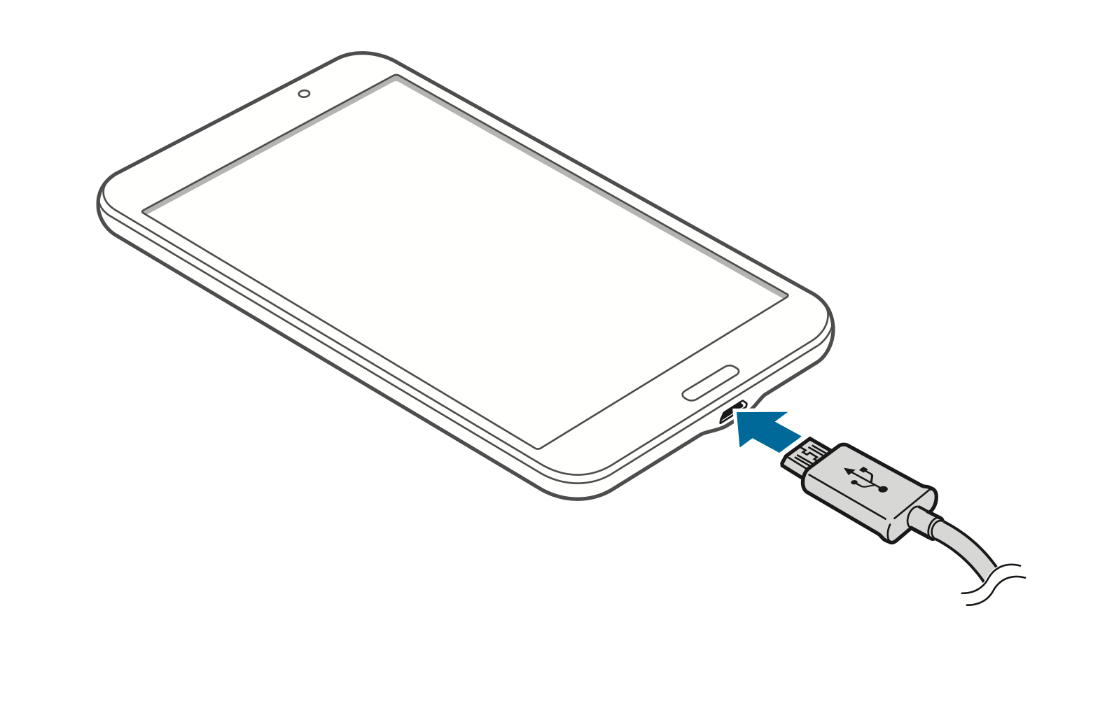
A.2 Charging the battery
Before using the device for the first time or when the battery has been unused for extended periods, you must charge the battery.
Connect the USB cable to the USB power adaptor and then plug the end of the USB cable into the multipurpose jack.
- The device can be used while it is charging, but it may take longer to fully charge the battery.
- If the device receives an unstable power supply while charging, the touch screen may not function. If this happens, unplug the charger from the device.
- While charging, the device may heat up. This is normal and should not affect the device’s lifespan or performance. If the battery gets hotter than usual, the charger may stop charging.
After fully charging, disconnect the device from the charger.
Your device provides options that help you save the battery power. By customising these options and deactivating features in the background, you can use the device longer between charges:
- When you are not using the device, switch to sleep mode by pressing the Power button.
- Close unnecessary applications with the task manager.
- Deactivate the Bluetooth feature.
- Deactivate the WiFi feature.
- Deactivate auto-syncing of applications.
- Decrease the backlight time.
- Decrease the brightness of the display.
A.3 Turning the device on and off
When turning on the device for the first time, follow the on-screen instructions to setup your device.
Press and hold the Power button for a few seconds to turn on the device.
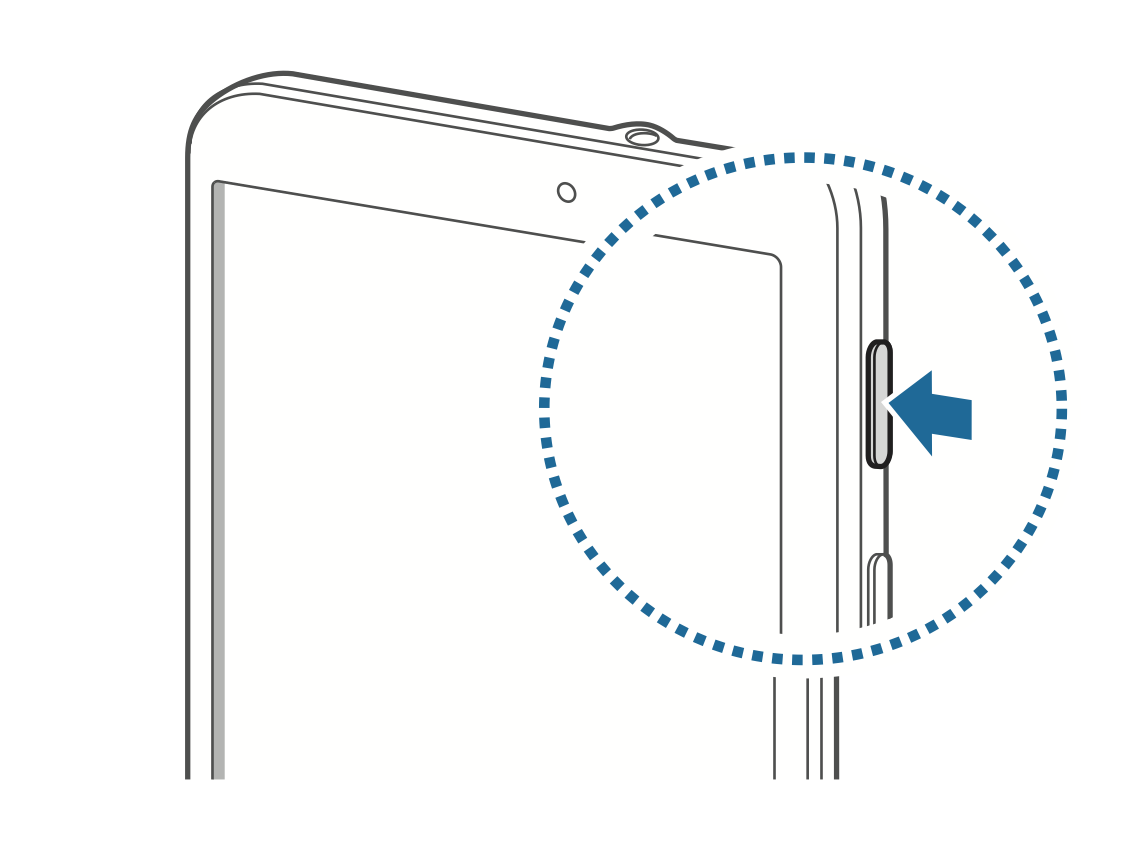
To turn off the device, press and hold the Power button, and then tap Power off.
A.4 Locking and unlocking the device
When not in use, lock the device to prevent unwanted operation. Pressing the Power button turns off the screen and puts the device into lock mode. The device automatically gets locked if it is not used for a specific period.
The steps to unlocking the device depends on the lock screen settings of the mobile device. By default, the swipe method will unlock the screen. This is done by pressing the Power button or Home button when the touch screen is turned off, tapping anywhere on the screen, and then swiping on the touch screen in any direction. See Section A.5.3.4 to learn more about the other lock screen methods.
A.5 Configuring devices for data collection
It is important to configure mobile devices such as mobile phones or tablets that are going to be used for data collection. From the point of view of a survey lead or survey manager, it will be important that the devices are configured in such a way that:
- Prevents inappropriate use by enumerators;
- Conserves the battery power of the device; and,
- Maximises its use for data collection.
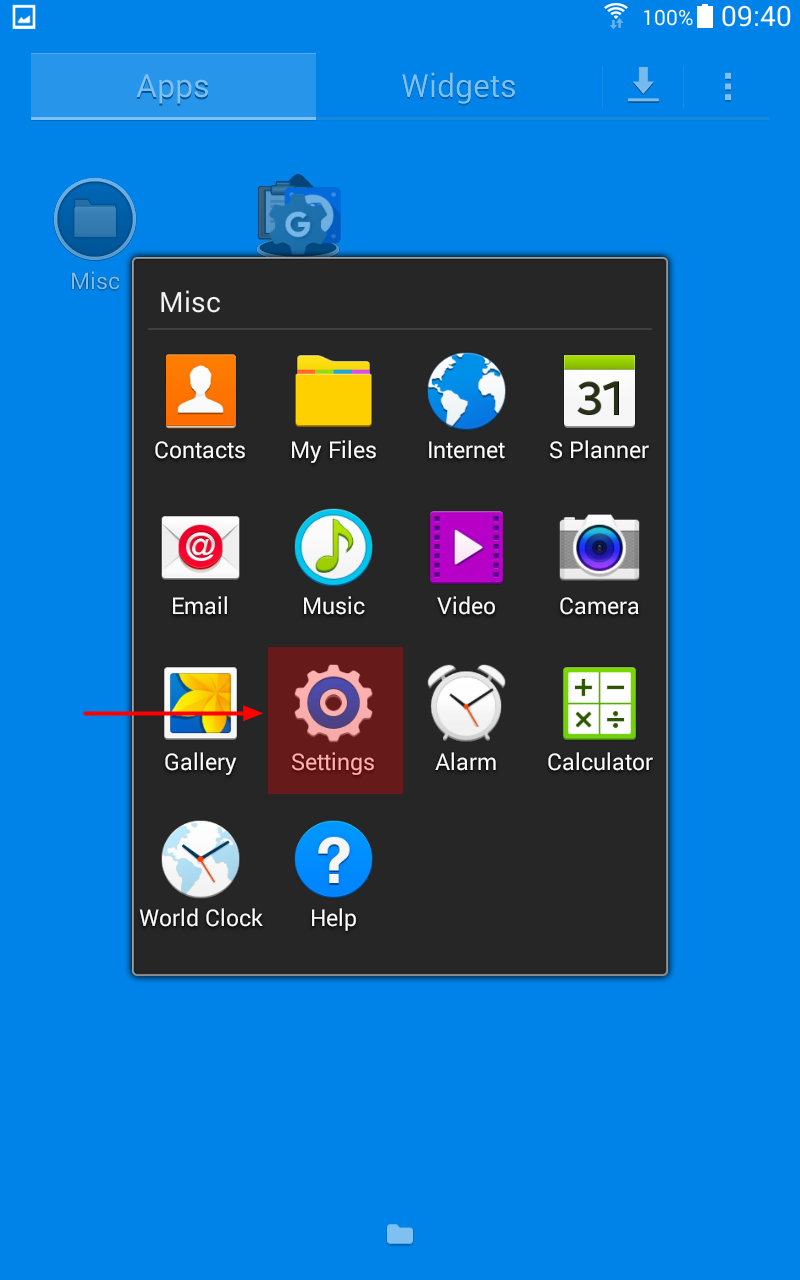
A.5.1 Go to settings
On your tablet device, tap on the Settings app (Figure A.4 (a)).
You will then see the following on your tablet screen (Figure A.4 (b)). There are four (4) tabs on top of the screen named Connections; Device; Controls; and General. These are the four settings categories that can be configured as needed.

A.5.2 Configure the Connections settings
Under the Connections tab (Figure A.5), the following settings should be configured:
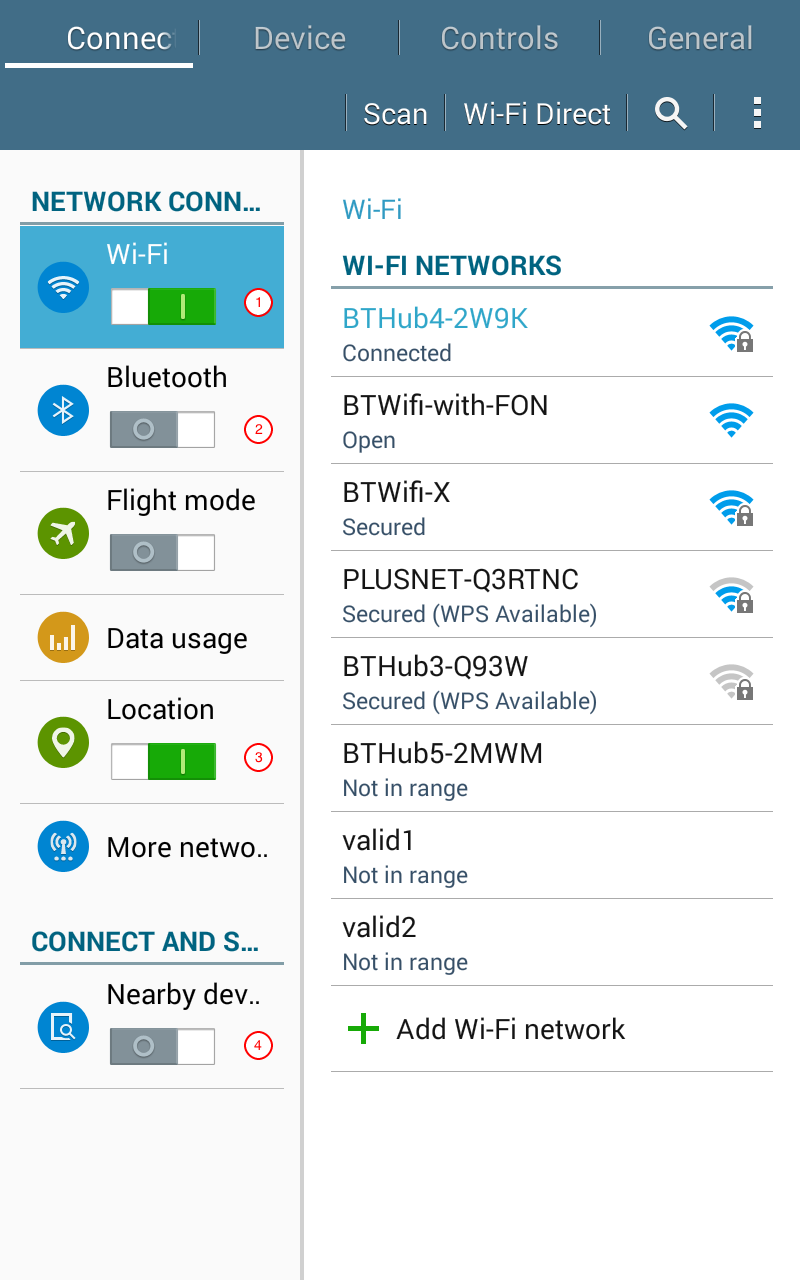
Wi-Fi (1) - this should be set to OFF during the data collection process. When ON, the device keeps on scanning for Wi-Fi networks that are available
Bluetooth (2) - the Bluetooth should be set to OFF during the data collection process. When Bluetooth is ON, the device keeps on scanning for Bluetooth devices to connect to. This continuous scanning will drain the batter device very quickly.
Location (3) - this should be set to ON during the data collection process if you will be collecting GPS coordinates.
Nearby devices (4) - this should be set to OFF. This settings uses near-field communication (NFC) to communicate with other devices that are NFC-enabled. Just like Bluetooth, when turned ON, the device will keep on scanning to look for devices to connect to which will drain the battery device very quickly.
A.5.3 Configure the Device settings
Tap on the Device tab.
A.5.3.1 Sound and display settings
The first settings to configure will be the Sound and Display (Figure A.6).
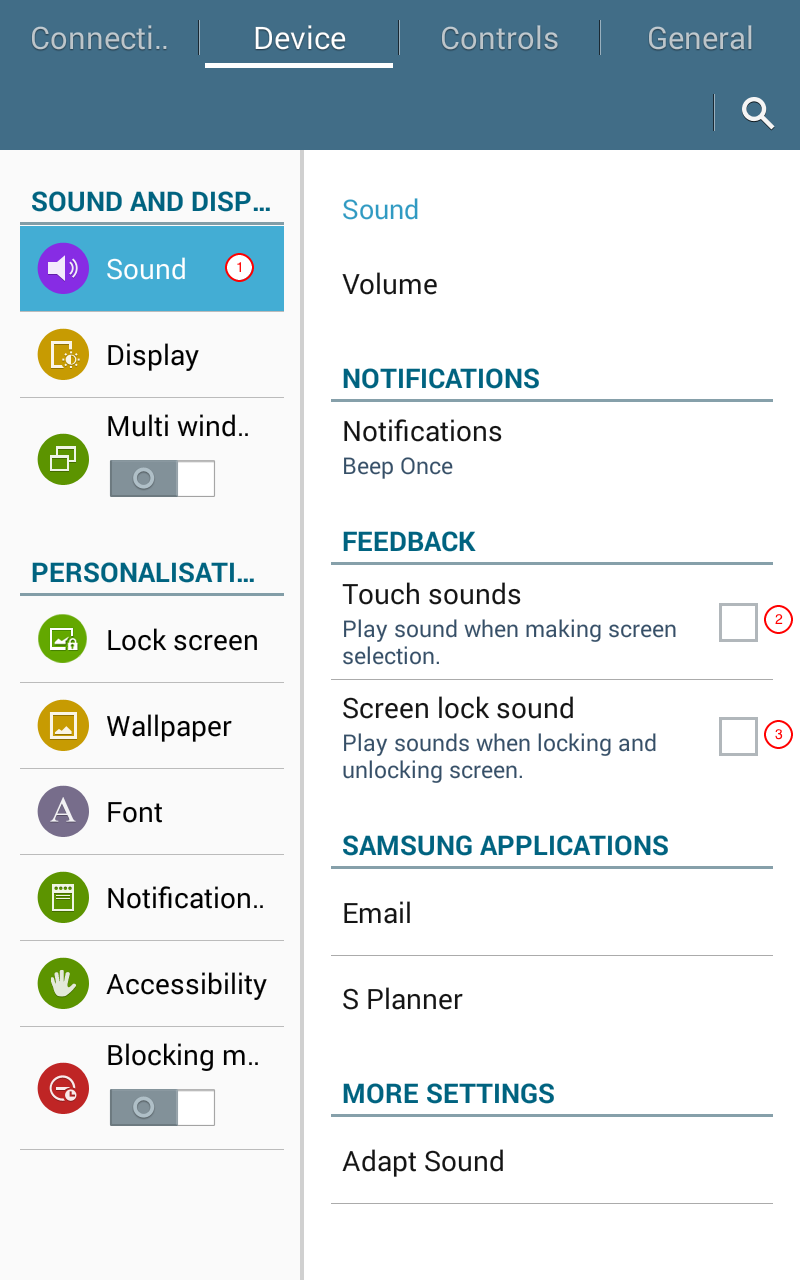
For Sound (1), the most relevant settings to configure will be whether you would want to get sound-based feedback when you interact with the device such as touching the screen and making selections (2) and when you lock or unlock the device (3). These settings are checked by default as most users prefer some form of feedback when they tap on the screen or when they lock or unlock the screen. Uncheck this option if you prefer not to have these sounds on. These settings have very little effect on the device battery life and is more a matter of preference.
A.5.3.2 Display settings
Next, tap on Display (1) settings under the Device tab settings (Figure A.7).
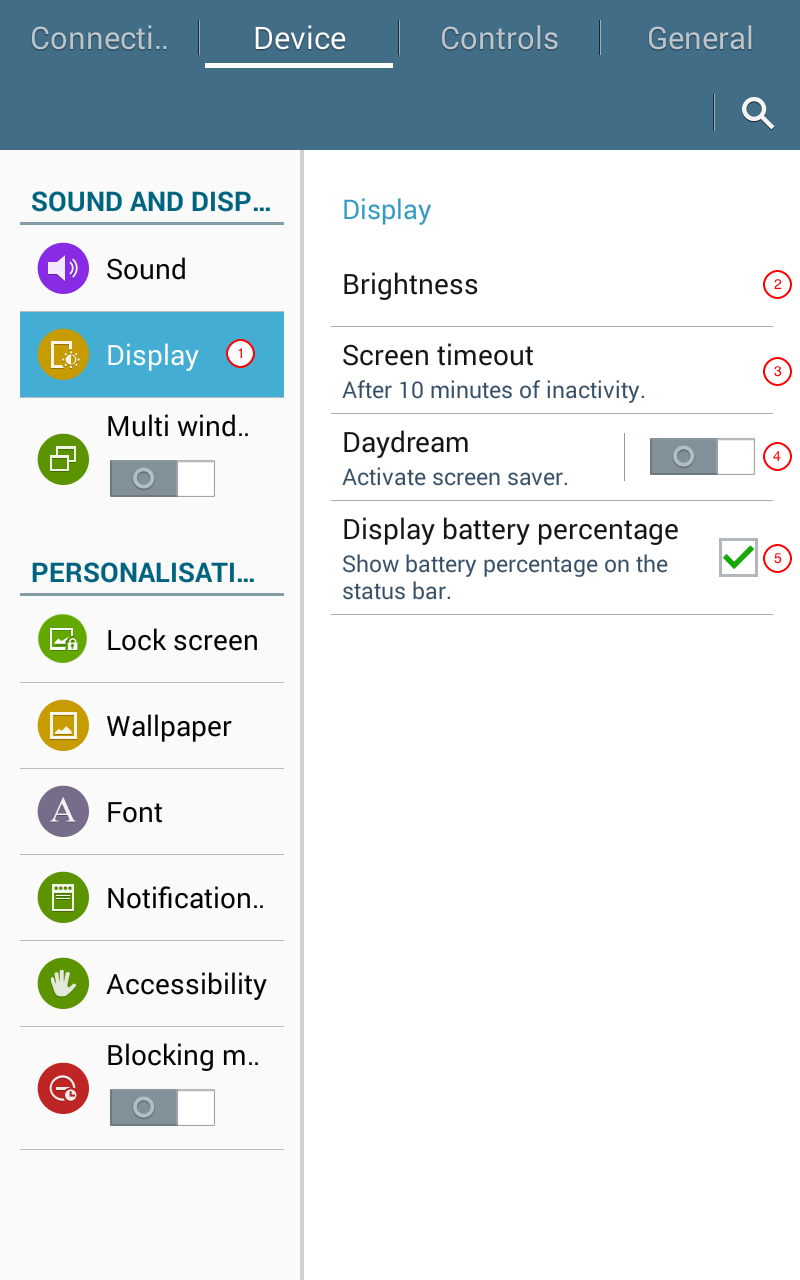
The following settings can be configured here:
Brigthness (2) - this should be configured as needed but ideally should be set to no more than middle level brightness. Make sure that screen brigthness is not set to maximum at any point as this will drain the battery device very quickly.
Screen timeout (3) - this setting determine how long the screen stays on when device is not in use. This should be set to about 10 minutes of inactivity. This is just about enough time for enumerators to ask questions and get a response and then record on the device without the screen going OFF and then the device going on lock.
Daydream (4) - this is the screensaver for these devices. This should be turned OFF because when activated, a screen saver turns on when the device is inactive instead of the screen turning OFF and getting locked. This causes battery device drainage.
Display batter percentage (5) - this should be checked. This will help enumerators to determine whether their devices have enough power or not.
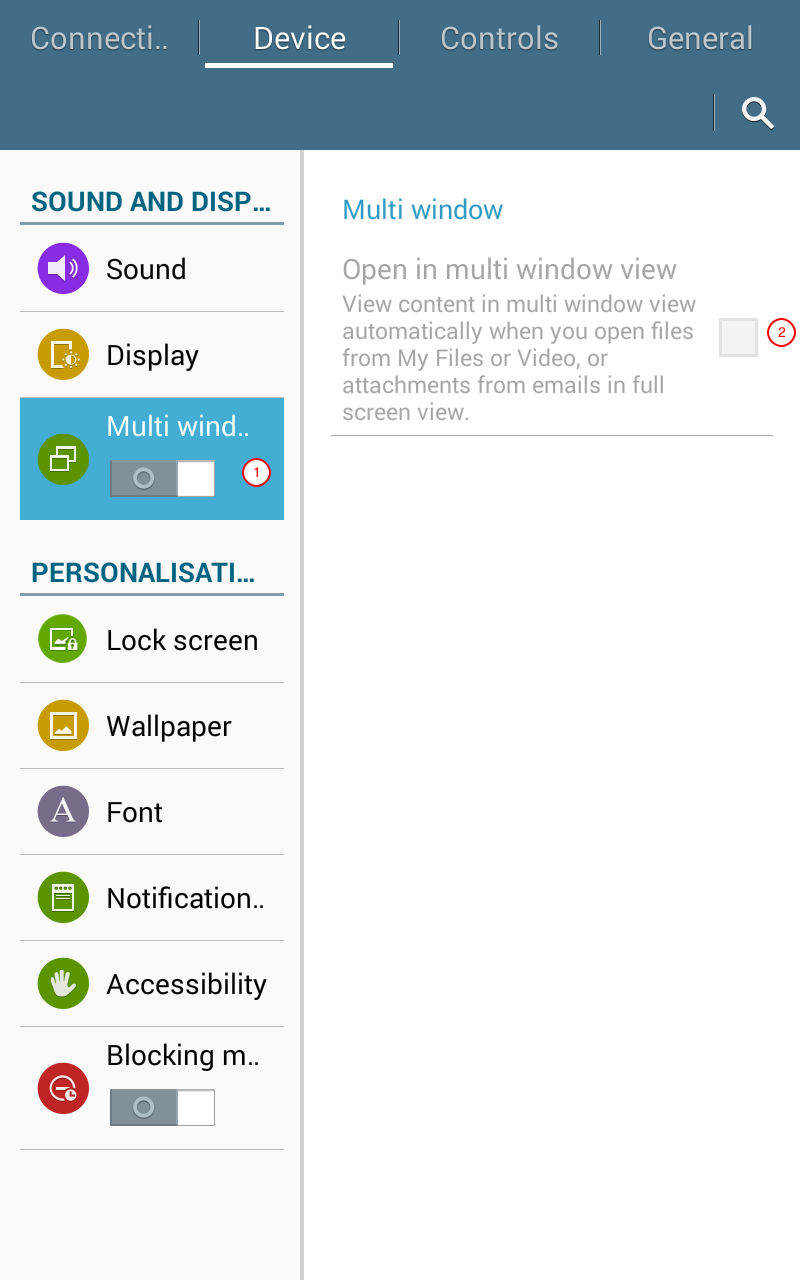
A.5.3.3 Multi window settings
Next tap on Multi window (1) settings (Figure A.8). This should be unchecked (2). For the purposes of data collection, there is no use for the multi window functionality.
A.5.3.4 Lock screen settings
Next tap on the Lock screen (1) settings (Figure A.9). Under this setting, there are three main things we need to configure.
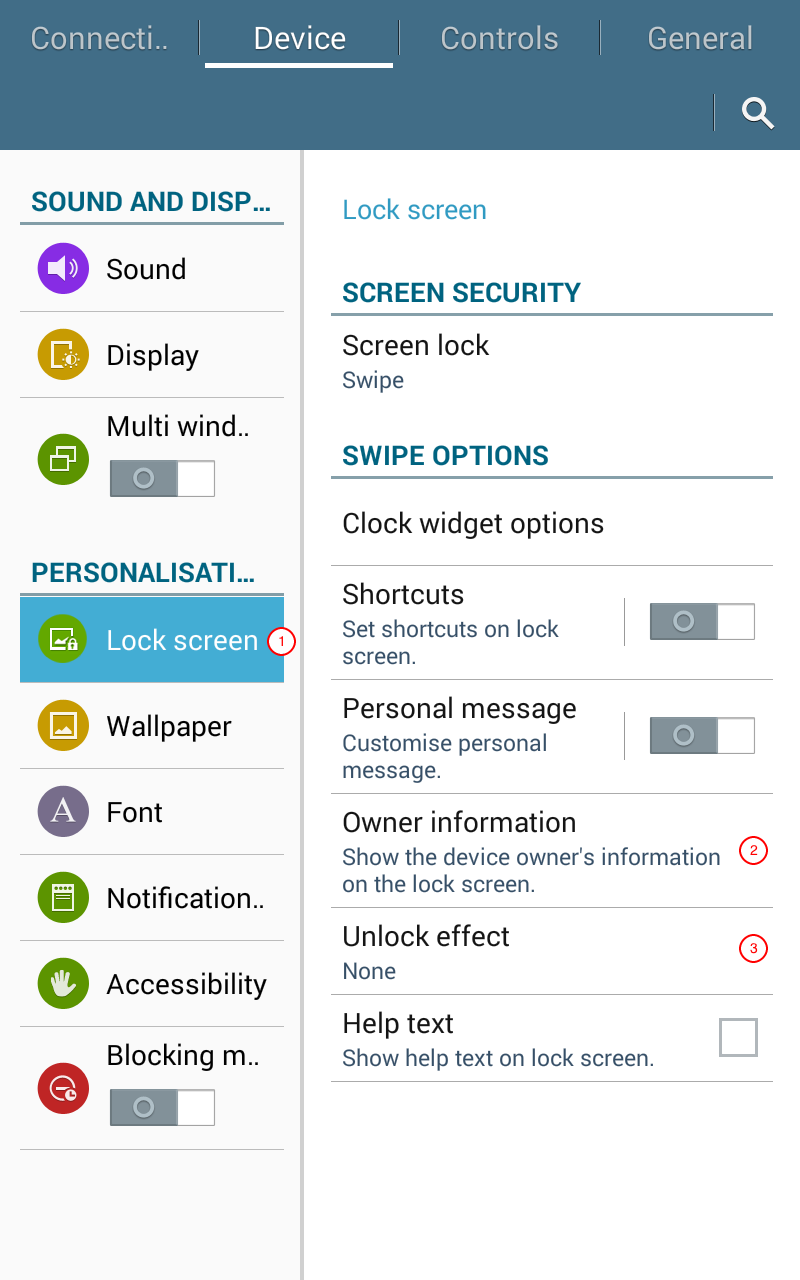
The Owner information (2) setting would be good to configure because this allows you to name the device you are setting up. This is especially important when you are managing multiple devices for data collection and you need to identify one device from the other so you know what device goes to which enumerator and other management task.
The Unlock effect (3) setting should also be configured to None. This setting ensures that unlocking of the device is quick and easy without unnecessary effects.
The Screen Security setting should be configured as this provides a layer of security on the mobile device that will enable only authorised users to access the contents of the mobile device and add/change settings of the mobile device. There are currently five options for screen security: none, swipe (default), pattern, PIN, and password. It is recommended to set a screen lock method of either a pattern, PIN, or password. Figure A.10 shows an example of a screen lock pattern security for a mobile device.

A.5.3.5 Font settings
Now, tap on Font setting (Figure A.11).
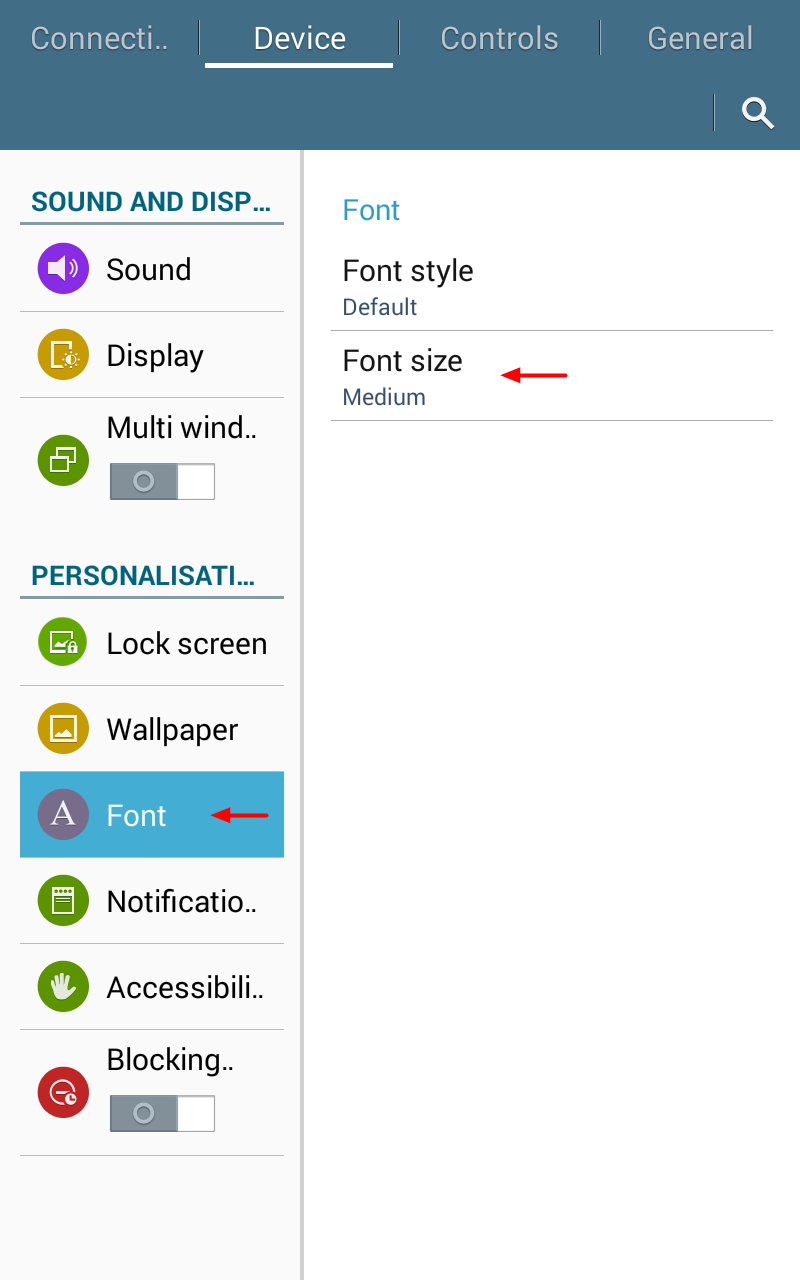
Here, there is one key setting to consider and that is the Font size. You should consider the best font size that would make the text of the device easier to read for enumerators. The device defaults to Medium which is generally a good font size to use. Change this font size if you think a bigger or smaller font would be necessary.
A.5.4 4. Configure the Controls settings
Now, tap on the Controls settings tab on top of the screen.
A.5.4.1 Language and input settings
The first setting to configure is the Language and input (1) settings (Figure A.12).
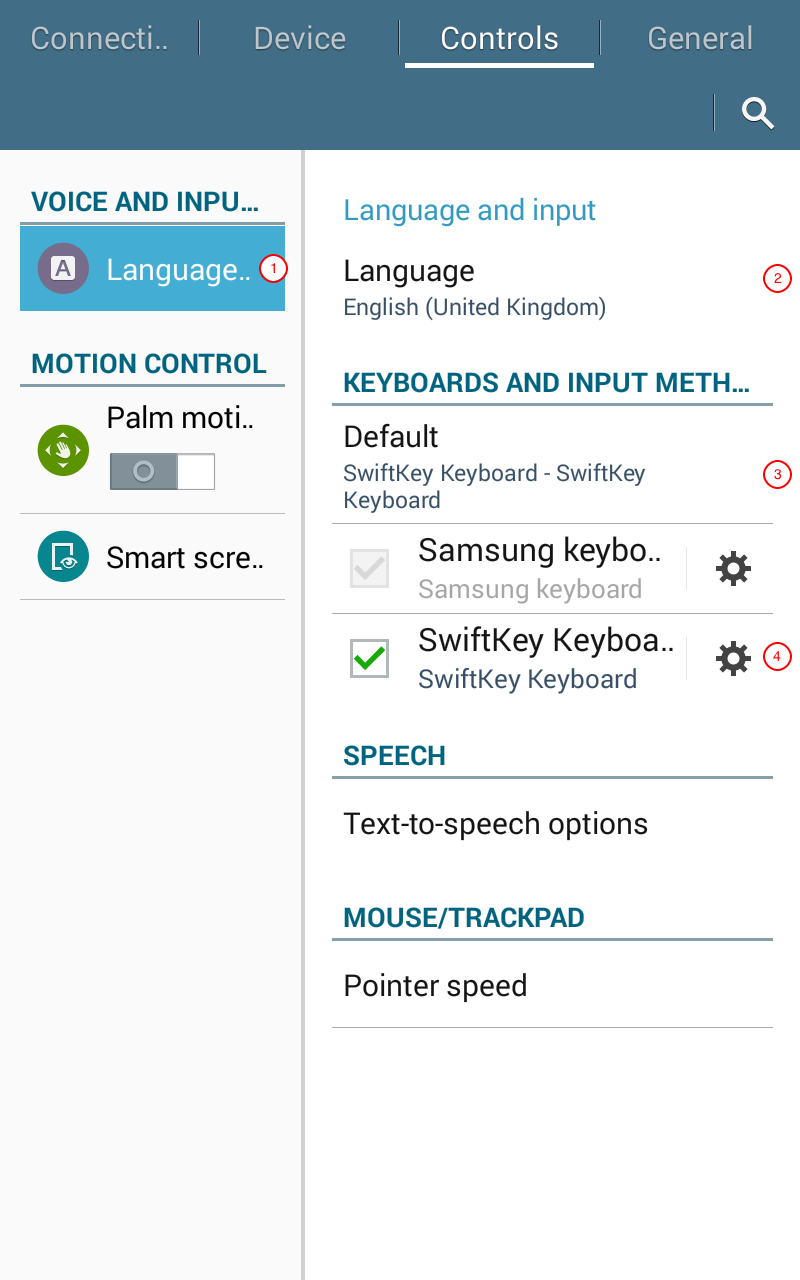
The language used in the device can be configured to the language that is most appropriate for the data collection. When the Language (2) setting is set to a particular language, the device uses that language throughout the device. In this example, the device is set to English (United Kingdom).
The next setting is Keyboards and input methods. By default, Samsung devices uses the Samsung keyboard. However, there are various keyboard applications now available that provide much better keyboard input than the default Samsung keyboard. We recommend the use of SwiftKey keyboard as the layout of the keyboard is much better than the Samsung keyboard which allows for much accurate text entry.
To be able to enable SwiftKey, you first need to download and install the SwiftKey application from the Google Play Store or sideload it using an APK file. Once installed, the SwiftKey keyboard option now becomes available in the Keyboards and input methods (4) settings. This keyboard option can now be checked. Checking this keyboard option includes SwiftKey keyboard as a keyboard choice for the user. To make it default, tap on the Default setting of the Keyboards and input methods, and then select SwiftKey as the default keyboard (3).
A.5.4.2 Palm motion settings
Now, set the Palm motion (1) setting (Figure A.13).
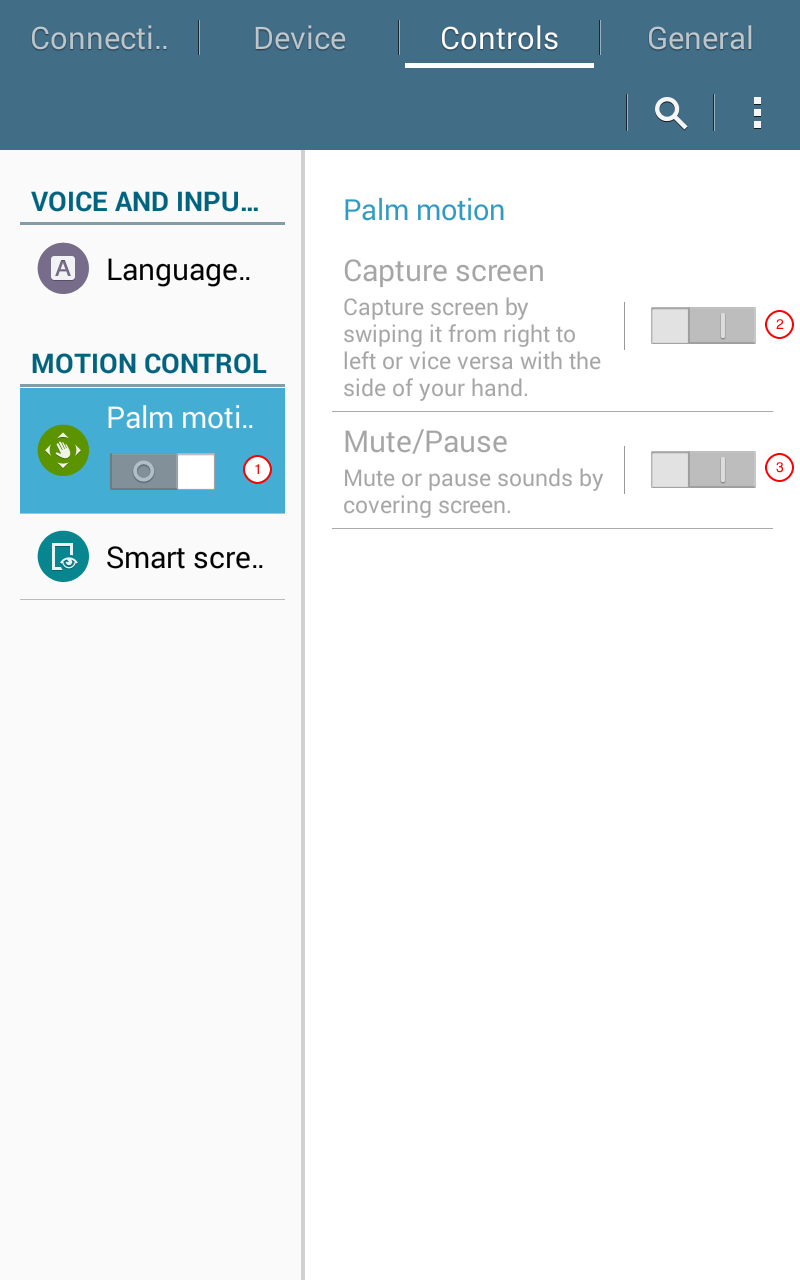
Turn off the setting for both Capture screen (2) and Mute/Pause (3) setting. This avoids enumerators unintentioally activating this gesture input which can confuse them on what to do next.
A.5.4.3 Smart screen settings
Now, set the Smart Screen (1) settings (Figure A.14).
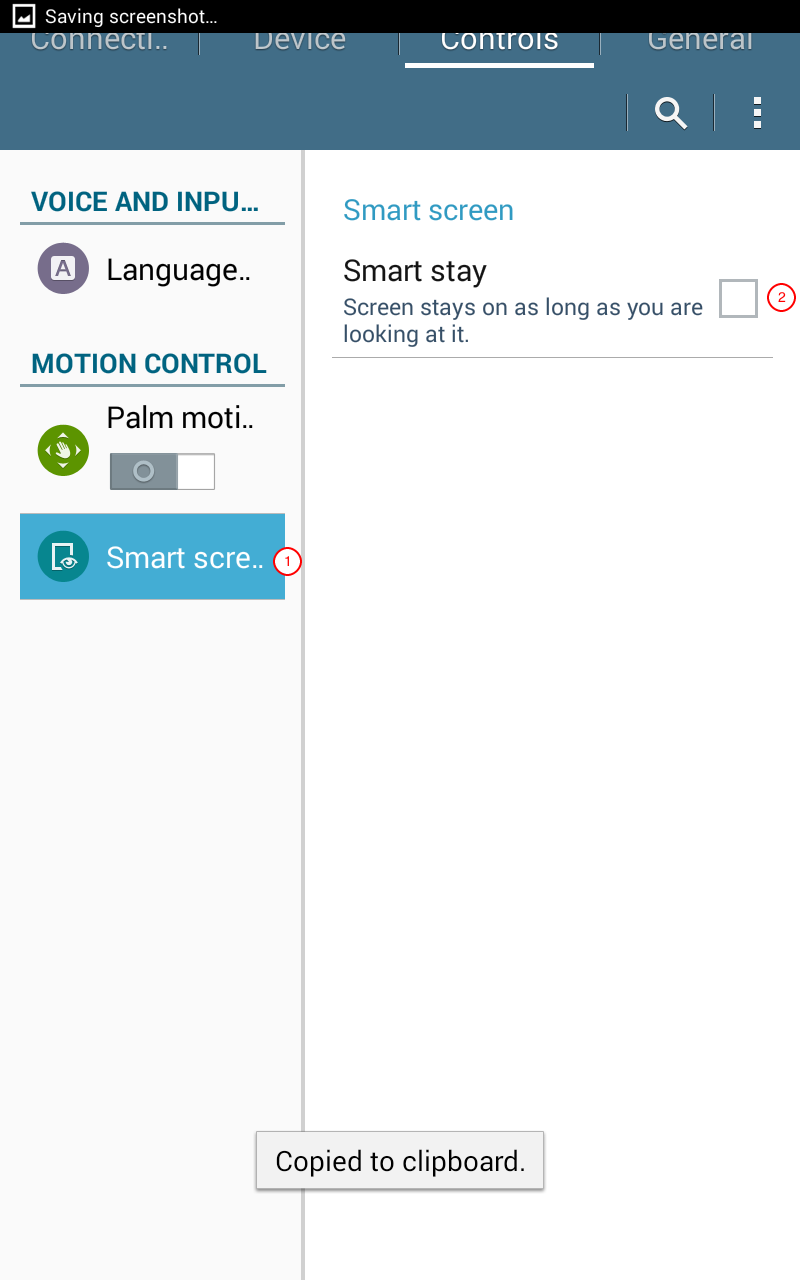
You should uncheck the Smart stay (1) option. Whilst this setting is a clever functionality, this can drain the battery device much quicker because it utilises the front camera to determine whether the user is looking at the screen or not.
A.5.5 Configure the General settings
Next, tap on the General settings tab.
A.5.5.1 Accounts settings
The Accounts (1) setting is the first to configure (Figure A.15).
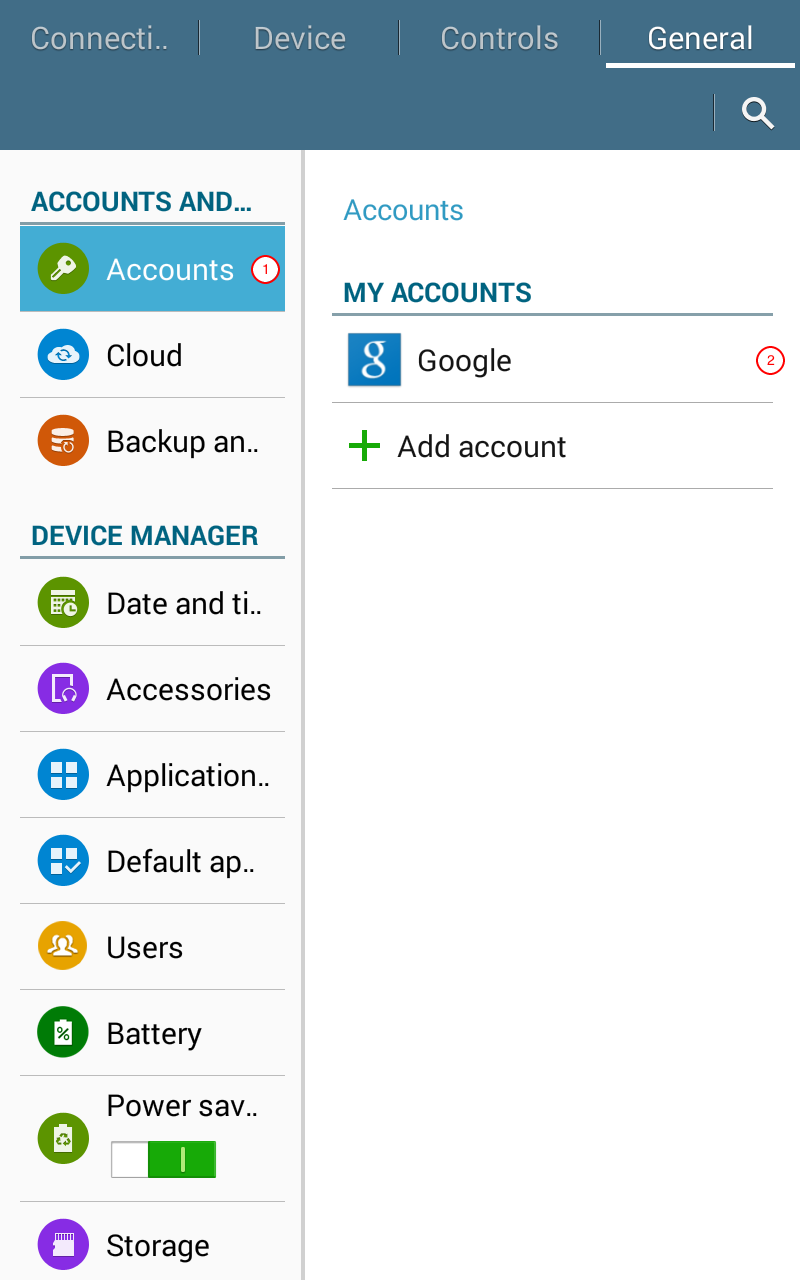
If you have already configured your device with a Google account, you should see under the Accounts section the Google icon (2). If not, this is the time to add your Google account. Click on Add account and then follow the instructions after that.
Other accounts can be added here. However, for purposes of data collection, there is no for these other accounts unless your data collection campaigns requires any other accounts setup in your device.
A.5.5.2 Date and time settings
Now, we should set the Date and time settings (Figure A.16).
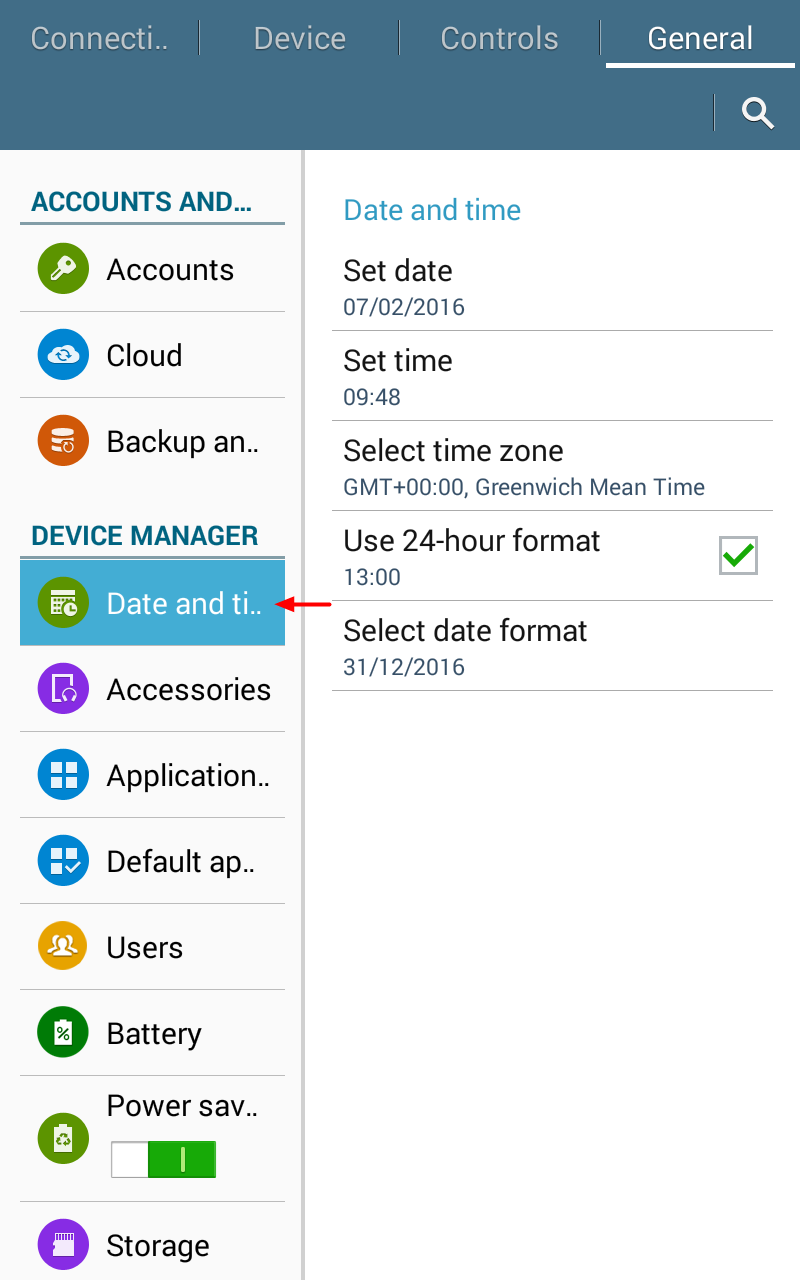
It would be important to set the Date and time settings of the device appropriately. This is relevant to data collection because some forms that collects dates uses the date and time of the device to determine what the current date and time is. If these settings are not set correctly, then the recorded date and time in the forms will also be incorrect.
A.5.5.3 Application manager settings
Next, tap on the Application manager (Figure A.17).
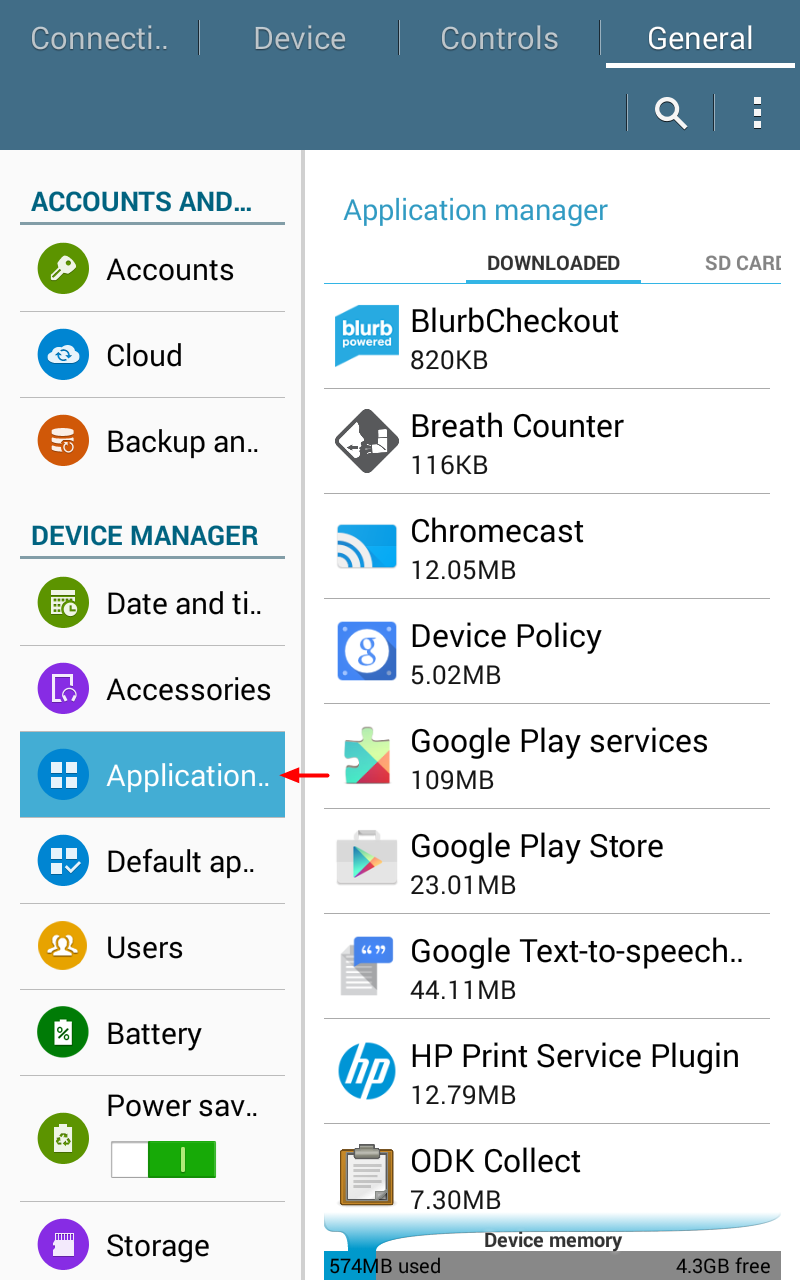
This setting allows you to disable or uninstall certain applications that is not really needed for your data collection. It is recommended that you disable or uninstall any applications installed on the device that will not be used by the enumerators for data collection. Doing so prevents unintended use of the device by the enumerators and ensures that the battery of the device is conserved and used only for data collection as much as possible.
It should be noted however that certain applications come pre-installed by the brand manufacturers. For some of these, they cannot be uninstalled or disabled as they have been hard set to stay on the device.
A.5.5.4 Power saving mode settings
Next, tap on Power saving mode (1) settings (Figure A.18).
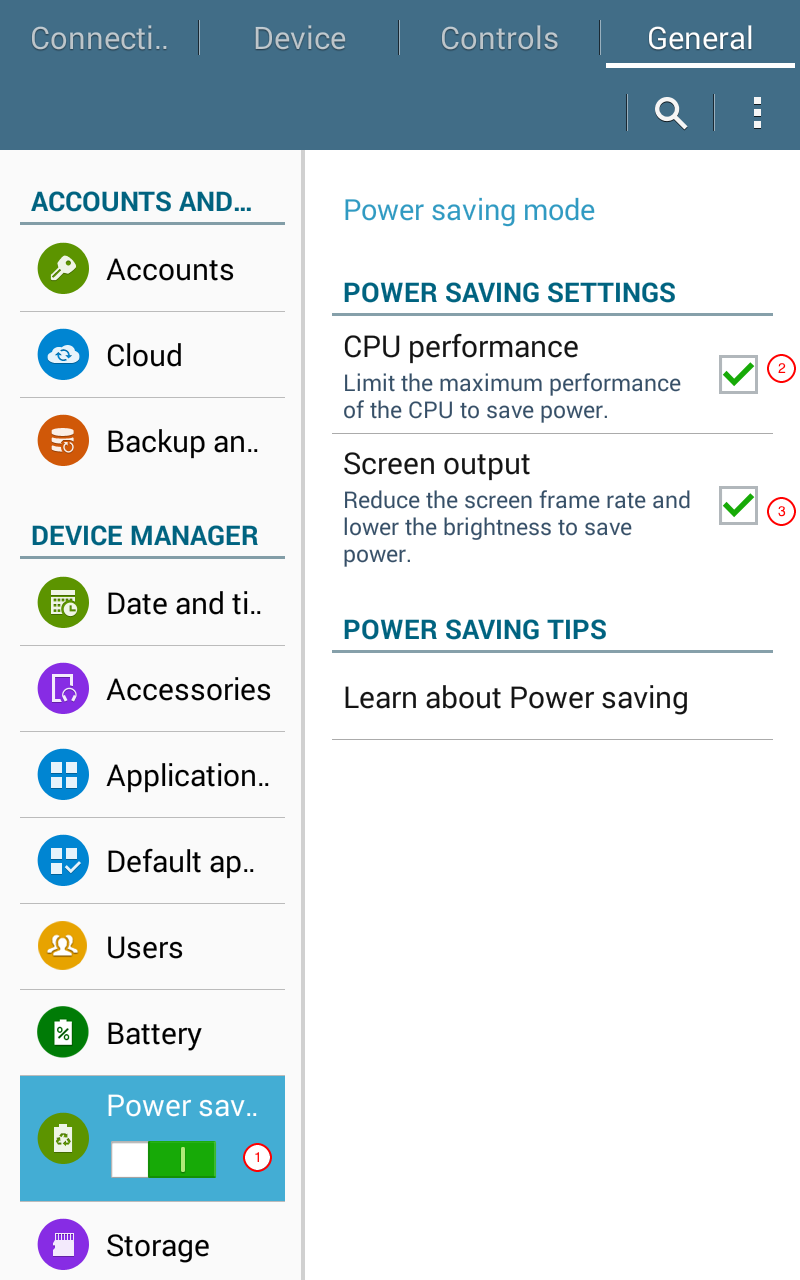
The CPU Performance (2) option can be checked. Data collection doesn’t require great CPU performance at all and definitely will not require maximum performance at any point. This will increase battery life of the device.